Fixes the bug that prevents saving screenshots in the Images folder
Regardless of the origin of the problem, there is no doubt that we are dealing with something extremely annoying, but, luckily, it can have an easy solution as we will be able to verify later.
How to fix the problem
Next, we are going to see different ways that we have to check why the captures are not saved in the default folder in Windows.
Check in OneDrive
The first thing we need to consider is whether we are using a Microsoft account to sign in to Windows or whether we are using OneDrive on our PC. And it may happen that the system is automatically saving the screenshot in our OneDrive account. Unless we have disabled the notification, Windows should show us a notice indicating that the capture is being saved directly to the cloud.
To avoid this, we must click with the right mouse button on the icon of the Microsoft storage service that appears in the system tray. Then click on the “Settings and help” option and enter the “Settings” section. Then, click on the “Backup” tab and uncheck the “Automatically save screenshots you take to OneDrive” box. Finally, click on “OK” to save the changes.
Find out where it's stored
If the captures are not being saved in the default folder and we are not using OneDrive either, we must find out where they are saved. And it is that once done in a folder it must be saved, so we have a simple way to find out. To do this, we open the File Explorer, we go to the “Quick Access” section and we enter the “Recent Files” section. Here we must find the captured image, so we must right-click on it and choose the “Open file location” option. This will open a new window where we can see where the image is saved.
Check folder permissions
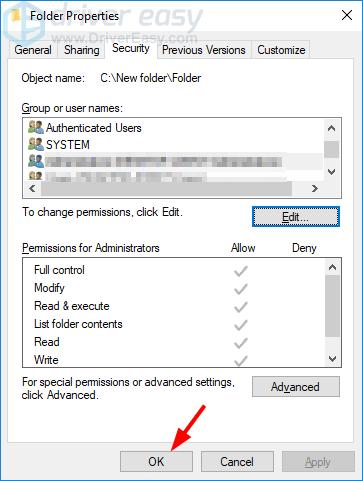
In the event that Windows is not saving the screenshots in the default folder (Images> Screenshots), we must check the permissions of the folder. That is necessary because if we do not have the permissions to write to it, they will not be saved to it, so it is important that we check it. To do this, right-click on the “Screenshots” folder and click on “Properties”. Next, click on the “Security” tab. From there, we must edit the permissions of our user to ensure we have Full Control over it.
Make a change in the Registry
If we continue with the problem, we can choose to make some adjustments to the Windows Registry. To do this we execute the keyboard shortcut “Windows + R”. This will open the “Run” command, we type regedit and press Enter. Once its window appears, we create a backup, in case something goes wrong, we can restore it without problems. We will do this by clicking on “File” and then on “Export”. Next, we navigate to the next location. In the next window, in the Export interval section, select “All” and click on “Save”.
HKEY_CURRENT_USER / Software / Microsoft / Windows / CurrentVersion / ExplorerNow in the panel on the right we must look for the value DWORD (REG_DWORD) ScreenshotIndex. In the event that we do not find it, we must create it by clicking with the right mouse button, clicking on New and DWORD Value, establishing that name.
Next, we double-click on the same DWORD to modify the base to decimal and then enter the value data as 695. Once this is done, click on “OK”.
Later to point to this registry DWORD to correct user profile settings, we are going to look at the User Shell Folders entry within the Editor. To do this we navigate to the following route:
HKEY_CURRENT_USER Software Microsoft Windows CurrentVersion Explorer User Shell FoldersNow in the right pane, we click on the entry {B7BEDE81-DF94-4682-A7D8-57A52620B86F} which is an expandable string (REG_ EXPAND_SZ). Later we make sure to write down the following valuable data:
C:/ Users/ Perfil de usuario /Imágenes /Capturas de pantallaWe accept the changes, close the editor and restart the system to see if the problem is solved.
Reset Windows
If nothing has worked so far, we can try resetting Windows to default settings without losing our data, in this way the system should be reset again and use the default location again. To do this we access the Configuration section, pressing the keyboard shortcut “Windows + I”. Then we select "Update and security". In the left column click on “Recovery”. Now, in the right panel we click on “Start” in the “Reset this PC” section. In the next step we choose the “Keep my files” option and the system restore process will begin.
There is no solution? Use Paint
If we can't solve the problem, we can use Paint, the native Windows image editor to be able to save each capture individually wherever we want. To do this, we press the “ImpPnt” button, and once the image is captured, we open Paint and press “Ctrl + V” (paste). This will cause the captured image to appear within the editor. From it, we can make small changes to it, adding elements, making cuts, etc. And of course, we can save it in the desired path, simply by clicking on "File" and "Save as," being able to select the format we want (JPEG, PNG, etc.)

