How to connect two computers to a network via WiFi
Connecting two computers on a WiFi network is an extremely useful practice to have shared resources on our local area network. By doing this, we will get two computers to see each other perfectly in a LAN and WLAN network regardless of whether we have WiFi or cable equipment.
Index of contents
For this, we will use the workgroups that Windows 10 has. In this way, we will not need to assign fixed IP addresses to the computers and consequently lose the Internet connection in many misconfigured cases. The example is valid for any type of router and any type of WiFi protocol or bands. Without further ado, let's begin!
Advantages of connecting two computers to a network via WiFi
When we connect to the Internet through our router we can access all the services that this global network offers us, without anyone from the outside knowing what we have in our house. Thanks to the router, our internal network or LAN is kept hidden from the WAN network or the Internet, thanks to the NAT function and the firewall that these devices have.
Whether we have a single computer or 100 of them, we are connected to a LAN, and in it we can do many things outside the Internet. One of them is precisely that of sharing files from one computer to another, but also printers, network hard drives, NAS, and even setting up our own servers.
Precisely in this article we will be able to verify how the Windows shared file system has evolved, and how extremely simple it is to carry out this procedure today. But for everything to go perfectly and as expected, many issues must be taken into account, and all of them will be explained during the tutorial.
Among the advantages of connecting two computers on a WiFi network we have these:
Connect two computers on a WiFi network in Windows 10 step by step
If more to say, we are going to start the process, through which we will explain everything that must be taken into account to obtain the expected results.
Workgroup and team name
To connect two computers to a network via WiFi or other means, we need them to belong to a work group and have a name.
The workgroup has been used since the days of Windows XP, and it is an identifier that is used so that all the computers connected to a network can see each other and exchange information if we so decide. As we can imagine, this function makes a network computer compatible with Windows 10, 8, 7, Vista and XP.
The computer name is used to identify the computers on the network, obviously if we have two their presence is clear, but with a large volume, giving them a name is going to be quite important. The computer name is associated with its IP address, so users do not need to know the computer and can "call" it by its own name from the file browser.
Another very important point that we must know is that at no time will we need to assign a fixed IP address to any computer. The fact of belonging to the work group and having a name is more than enough for it to be seen by another team.
Change workgroup and computer name
These parameters are established by default on our computer, but at any time we can modify them to our liking.
To access these parameters and modify them we will have to open our Windows explorer through any folder and then go to "My Computer".
There we must right-click on the icon and choose "Properties".
A window will open and we will be able to see a lot of information about our team. What interests us is rather in the central area, in the “Name configuration…” section.
The default name of the computer will always be DESKTOP followed by a few characters, while since the beginning of Windows XP the workgroup will be WORKGROUP.
To change any of these two parameters we are going to click on “Change configuration”, and for this we need administrator permissions.
In the window that appears, click on the “Change” icon, and then a window will appear with the name of the team and below the work group.
Modifying these parameters implies the need to restart the computer for the changes to take effect on the system.
We remember that, if we want to connect two or more computers on a WiFi network, all of them must belong to the same work group. This is essential for it to work.
We see that after the restart the name has been changed successfully. We have decided to keep the workgroup as standard for convenience when testing equipment arrives.
Configure user password (it is necessary)
We still need to make more configurations to connect the Windows 10 network computers. One of them is to have a user password to access the computer from any other.
For security, we always recommend having an access password. And in any case we will only have to write it once, since we have the option to remember credentials for future access.
So let's go to the beginning and click on the configuration wheel at the bottom left of the menu. Then we will access “Accounts”.
Here we can check our team name in “Your Information” and set a key in “Login Options”.
If we have a Microsoft account to access the computer, the user to access from the network will be our email.
Set sharing and private Wi-Fi options
Going into network matters, to be able to connect two computers to a WiFi network and to see them correctly, it will be necessary to make certain modifications to our network or to the sharing options.
And we must differentiate between a public network and a private network:
Here we are going to have two options, either configure the WiFi as private or activate the detection of shared use on public networks. Let's look at both methods.
Let's go to the wonderful configuration panel again and access the network section. In it we are going to click on “Wi-Fi” and then on the active connection that we have.
Once inside we have decided to change the WiFi connection to Private mode, since we do not intend to connect outside our home. In any case, we can come here in the future and move it to Public again.
The next step is to access the sharing options, so we are going to go to the taskbar and click on the WiFi icon with the right button. Then we will select “Open network and Internet settings”.
We move the screen down until we find the option "Sharing options". We will access them to establish the relevant configuration.
The function of these options is to provide visibility to the computer on the network and, in turn, it will also be able to see other computers. This is the essence of having two networked computers, right?
As a result of the above, Windows separates these options into three sections. The first section will be for configuration on a private network, the second for a public network, and in the third case we have generic options that affect both networks.
In our case we are going to activate the options included in the first section, that of private networks, to give access to our private WiFi connection so that it can see computers on the network and it can also be visible.
In the second section we are going to leave everything deactivated, although you can activate these options if you have kept the WiFI as public. This makes us more susceptible and decreases security.
And in the third section we are going to activate the first option and keep the next two by default, that is, we will keep 128-bit encryption for the connection and password protection.
Share folder on the network
Now we are going to make the connection of the equipment effective, so the least we can do is see how to share a folder in Windows 10.
We are going to create any folder and we are going to right-click on it. Then we will access its “Properties”.
In the window that appears, we go to the “Share” tab. Know that if we do this directly on a hard drive, the procedure will be exactly the same.
Well, here we are going to click first on “Share…”.
In the new window that appears, we have to select the users that we want to access this folder. It makes sense to select “Everyone” so that users on other computers on the network can access the share.
If we only want to give access to a specific user, this must also be created on the computer that shares the folder.
The next step is to assign the pertinent permissions, with “Read” you will only be able to see the files inside, and with “Read and write” we will give you editing permissions.
But we haven't really shared the folder yet, so we're going to accept this setting and in the initial window we're going to click on “Advanced sharing…”
In the new window we check the option “Share this folder”.
Next, we click on permissions and again we choose all users and activate the permission assignment boxes as we deem appropriate. As you can see, Windows repeats certain options on a recurring basis without a convincing explanation.
Now we can put in this folder as much crap as we deem appropriate so that from the other computers we can see it, copy it and execute it. It is then time to change equipment and go to the client PC.
Access a computer connected to a Wi-Fi network
To make the action of connecting two computers on a WiFi network definitively operational, we have to go to the other computer through which we want to access this new shared resource.
Of course we can connect it to the same WiFi or with an Ethernet cable. Even if we have our WiFi repeater in our house or a mesh system, the operability will be complete and invariable, we have already said it ad nauseam.
What do we need to do in this team?
With no more time to lose and having fulfilled the above, we are going to open our file explorer and go to the network device.
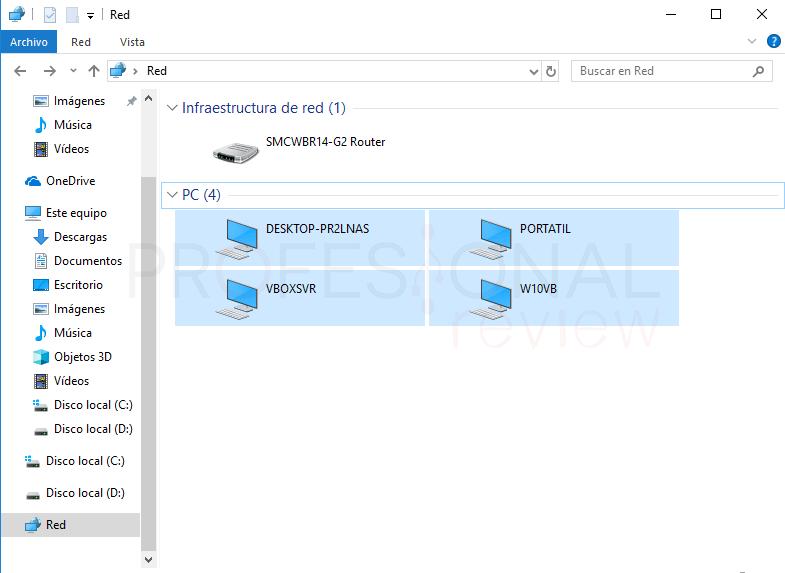
If we have done everything correctly, the PC on which we have shared the folder will appear in the list. The router of our network will also appear, although we do not have to pay attention to this in this tutorial.
When we try to access the computer, it will logically ask us for a username and password. We place the access credentials of the other computer or those of the user that we have configured. If we do not want to put them anymore, we will activate the remember box.
Once inside we can edit the folder if we wish, add files and drag the folder to the desktop to place it as a shortcut.
An interesting aspect of sending it as a direct access is that it will not be linked to the IP, but to the name of the computer. So when it changes its IP we will still have access to it.
Disable Users Shared Folder
Windows is a very clever system and to annoy the user a bit, it automatically shares the entire Users folder on its own. Something that is phenomenal if we want them to meddle in everything that we have stored in it.
To disable sharing of this folder we are going to go back to the server machine. We will access “My Computer> Local Disk” click on the “Users” folder, access its properties and enter the sharing tab.
In this case, simply uncheck the "Share this folder" box in advanced sharing. With this we already cover our backs for what we have stored in it, since a user with access permissions will be able to enter it as in any other shared one.
Disable password protection (not recommended)
Although not recommended, it is possible to disable password access to shares. We neither recommend it nor does it work too smoothly, since it will normally be that when accessing the computer it sends us an error message.
Likewise, with access from a Smartphone we will be obliged to enter a username and password, otherwise it will not allow access.
Access shared folder from Android phone
With the configuration that we have made to connect computers on a network, it is also possible to access the shared folders from a Smartphone. We do not have to do practically anything, just install the application that we see fit.
We have used an Android phone on which we have installed the Network Browser application. Not for anything in particular, but because it is the first one that has come up when looking for an App to access the Windows folder.
Just by opening it, it already detects the computers that we have visible on the network, although in this case they are defined by their IP address and not by their network name.
The one that interests us in the example is that of the second IP, remember that you can check what the IP address of your computer is with the “ipconfig” command from the Windows command window.
In any case, we click on the host that interests us, and it will ask us to enter the username and password. Click on “Save” and we will enter without major problems.
Conclusion on connecting two computers in network by WiFi
So far the complete tutorial on connecting computers on a network has arrived. An extremely simple procedure to carry out although with many details to take into account so that everything goes perfectly and we understand all the details.
The process is applicable to Windows, Windows 8, 8.1 and Windows 7 systems. In Windows Vista it changes a bit and in Windows XP it is only about sharing the folder as it has less security.
We leave you with more tutorials and articles of interest on networks:
Have you managed to connect your equipment to your WiFi network? If you have had any problem tell us in the comment box.

