So you can configure the WiFi Mesh D-Link COVR-X1862 in Bridge mode
D-Link COVR-X1863 (3 nodes) Buy it at EUR245.44
Once we know what this configuration mode is for, we are going to configure it with the wizard that integrates this D-Link WiFi Mesh system.
Configuration of the COVR in bridge mode
The first thing we will do is take one of the nodes of the package, connect it to the electric light and wait a couple of minutes. Next, we will connect to it via cable or WiFi, if you connect by WiFi the default password is on the installation card or on the sticker just below the COVR router. Once we have connected, we will have to put the IP address 192.168.0.1 in the web browser and access the configuration menu, the default password is “password” and click on “Login” to start with the complete configuration wizard step Step.
In the first menu we can see the terms of use and the privacy policy, we must click on “I accept” to go to the next configuration menu.
The “bridge mode” that we are going to configure does not appear anywhere in this menu, it is completely normal, we must go directly into the firmware to be able to configure this. In this menu we must configure it in router mode, to later configure it in bridge mode, in this way, we will not have any problem when changing the configuration mode.
In the following menus we will configure the Internet connection, by default DHCP and without VLANs, as we are going to configure it in bridge mode, it is not necessary to configure the Internet connection part. We also have the possibility to change the WiFi SSID network name and the WPA2 password, change the admin password of the router and configure the updates of the WiFi Mesh system, finally, we will be able to see a summary with everything that we have configured.
If you have more COVR nodes, you can plug them into the mains now and they will automatically configure with the main router, we don't have to do any additional configuration.
Once we have finished the configuration wizard, we get back into the firmware of the WiFi Mesh system, regardless of whether we have the COVR nodes connected or not, it does not matter that we have not turned them on yet.
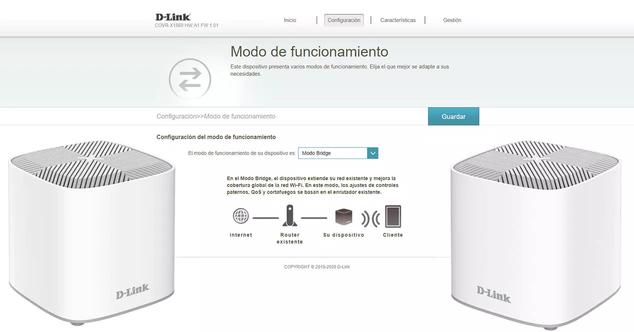
We have to go to «Configuration / Operating mode» to change the mode to bridge mode.
We select the bridge mode, it will indicate that in this configuration mode the parental control, QoS, firewall and other services such as NAT and DHCP server will be deactivated, something completely logical and normal in this operating mode, all these functionalities must be done now by the main router of our operator, and not the COVR AX.
Click on “Accept” to confirm that we want to change the configuration mode, the router will automatically restart and will be available again after approximately one minute.
Once the COVR AX that was acting as a router has been rebooted, we will now have the IP address of our operator's router LAN, something completely normal because the WiFi Mesh system is working as a WiFi access point, but with the functionalities of Mesh.
If we go into the “Configuration” menu we can see that we only have the WiFi, network and operating mode options enabled to change the configuration mode again, something normal because the rest of the services will not be available in this operating mode .
If we turn on the COVR nodes, we can see that it will connect to the main equipment without any problem, that is, we will have WiFi roaming and band-steering but using the main network of our operator's router, without doing NAT, which was what we wanted initially. Of course, we are going to have all the WiFi configuration options such as changing the SSID and the key.
We hope that with this tutorial you will be able to correctly configure your D-Link COVR-X1862 Mesh WiFi system in bridge mode, in order to connect it to your operator's router and not have any problem regarding the double NAT that occurs in these cases. Thanks to this bridge mode, we can connect one of the nodes to our operator's router and have a complete high-performance WiFi Mesh network. Of course, do not forget to deactivate the WiFi wireless network of your operator's router, to avoid WiFi interference with the WiFi Mesh system.

